Color Story: Shamrock Walk Portland 2013

DaringHue-com_ShamrockPDX2013(1)

I’m super excited to be posting about finishing one of the items on my list of 33 things I want to do this year. I finished the 5K Shamrock Walk in downtown Portland yesterday. I’ve been working toward this goal since June 2012 when I broke my ankle. It took surgery and several months of healing to even walk at all. I was in physical therapy from August through the end of December trying to rebuild strength and walk normally. In January I started training on my own to be able to walk in this event. And now it’s finally crossed off the list!

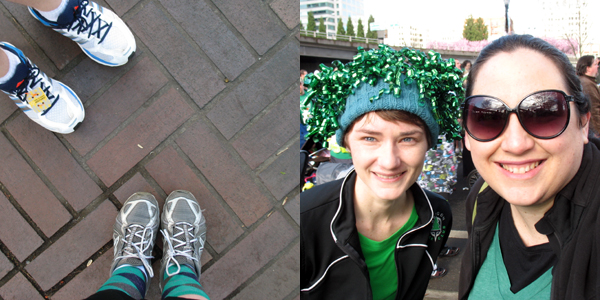
Left: Green argyle socks that I bought at Target for 90 cents! Right: My sister and I before the start. Her crazy headband was pretty tame compared to what everyone else was wearing.

DaringHue-com_ShamrockPDX2013(3)

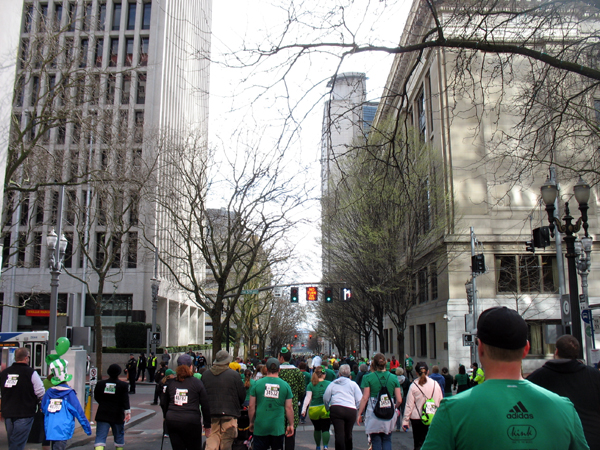
I had so much fun participating in this walk. My boyfriend and I took the Max to the event and the first thing I saw when we crossed the bridge was a sea of green 8K runners going down Naito Parkway. The waterfront was packed with 35,000 runners and walkers. We got lucky and had some sun for the walk. My sister is so amazing that after she finished her 8K run, she found me before the start of the 5K walk event and walked with me the whole way. My boyfriend finished his 5K run and then walked back so that he could finish the walk with us. It meant a lot to be able to finish this after all of the trouble with my ankle last year. Along the route we passed the place where I broke my ankle, and I hopped of the walk to take a photo of my feet in the place where I broke it.

DaringHue-com_ShamrockPDX2013(2)

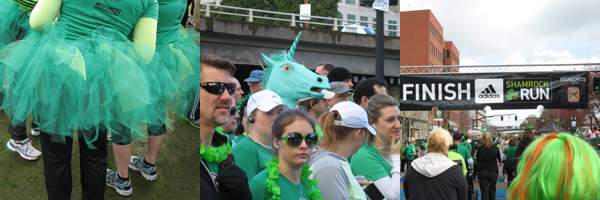
You typically see some strange things in Portland, but this day was crazy x 100. There were lots of green tutus, beards, unicorns, green wigs, boas, hats, crazy socks, dogs in green sweaters. It was so energizing to be a part of all that madness. Next year I’m definitely going to have to amp up my green because I felt a little underdressed in my argyle socks and green shirt.

I’ve decided my next event is going to be The Color Run in September. I want to run that event, so I have lots of work ahead of me. I think the thought of starting a race in white and ending up plastered in color is a great motivation. :)

Project Life: Week 7 (2013)

DaringHue-com_ProjectLifeWeek7

I’m sharing my Project Life week seven pages today. These have been in a state of almost done for a couple of weeks. I’m now officially three weeks behind. I think this weekend I’m going to do something to switch it up a little bit and finish the last three weeks all together so I can move on with the current week. The last couple of times I put my pages together I didn’t have very much fun, which tells me I need to try something different.

DaringHue-com_ProjectLifeWeek7(Left)

On the left page is a receipt from our crazy new vending system at work that can scan your fingerprint to link up to your account. Crazy! Shadow from school showing my portfolio and giant art bag. Left bottom is my sister in her new purple jacket from REI. Right bottom is an in process picture of my printmaking project for that week.

DaringHue-com_ProjectLifeWeek7(Right)

Photo on the top left is of Bill on stage as Mr. Rogers in his solo improv show. I had so much fun watching him win against a group of four. I was so proud of him. Journaling on the right with a little washi tape. Bottom is a photo from Valentine’s Day dinner at the Hot Cake House. I didn’t realize until I scanned these pages that the receipt I stapled to the photo is from December. I found it on our dresser, and we ordered exactly the same things so I thought it was the receipt from that week. I’ve decided it’s just going to stay in the album that way.

It’s Thursday night here, and I’m excited that there is only one more day until the weekend. I’m going to printmaking open studio tomorrow night after work, and get to see my first aquatint print. I finished the copper plate in class on Saturday, but didn’t have time to print it before I left. I had a whole week of building up the anticipation to see it, so I hope it turned out well!

Printmaking: Misadventures in Copper Etching

After I started my first printmaking class, I fell head over heels for relief printmaking. I loved carving linoleum, loved the end results, loved everything about it. Me + printmaking = ♥

And then came etching. To start, I had to go to three stores to find copper plates. The plates were expensive! Then, the etching process began, and oh my, was it messy! It’s a long process. First the plate is coated with hard ground, and an image is scratched into the hard ground with a sharp tool. Then the plate is dipped into ferric chloride so that lines are etched into the plate. Each dip takes 25 to 40 minutes. The hard ground needs to be cleaned off before you can ink up the plate. The inking process is very, very messy for newbies. Still, I pressed on…

DaringHue-com_Printmaking_Project3-Take1(1)

This is my image after a second dip into the ferric chloride. Pure line drawings have never been my favorite, and etching felt very close to that. Mysterious scratches appeared out of nowhere. It was hard for me to accept that I couldn’t completely control the outcome of this process. I didn’t especially like this image because it looked too messy. I thought about starting over, but ended up deciding to just accept it and finish so that I could move on to the next project. I prepped the plate for one last dip in the ferric chloride…

DaringHue-com_Printmaking_Project3-Take1(2)

… and then forgot the plate in ferric chloride when I left class for the day. Yikes! Luckily the lab monitor of open studio found the plate and pulled it out three hours later, or the copper may have dissolved entirely by the time the next class was in session two days later. This is what the plate looked like after I cleaned it up.

DaringHue-com_Printmaking_Project3-Take1(3)

And this is the printed image after my little mishap. I do like the dark areas, but everything else is a total mess. I was very embarrassed to have made a mistake like this, but I’m guessing I’m not the only newbie printmaker to have ever done this. I’m hoping this will the only lesson I’ll ever need, and that I’ll never forget to set a timer again. And because the universe must want me to try to like etching, I have to make another plate for this project. On to take two…

Daily Pattern Challenge: March

DaringHue-com_2013_March3

Good morning, Monday! I’m jumping back into Anika’s daily pattern challenge in March. This month I’ll be making all of my patterns out of stencils. So far I have used transparency film, but I’m open to using anything else I can find around the apartment. For the pattern above I used some craft acrylic paint and a brayer. I forgot how unpredictable stenciling can be! The paint crept under the edges of the stencil. It will be fun to play around with different types of inks and paints to see what effects I can get.

DaringHue-com_2013_March1

DaringHue-com_2013_March2

The two patterns above were created by layering two different colors of ink pads over the stencil. I just pressed the whole ink pad down into it.

I’ll be sharing my patterns daily on Flickr with the tag patternadaymar. You can also find me daily on Instagram with the tag #patternadaymar or #letsmakepatterns. If you want to join in (it’s fun!), check out Anika’s post.

Weekend Color: Blue Pattern Car

Blue Pattern Car in NE Portland, DaringHue.com

I found this little gem in NE Portland this morning. After five years, I sometimes still can’t get over how awesome this city is. I saw at least five weird/cool/funny things on my walk this morning. It’s hard not to be inspired when you run into little surprises like this all the time.

Printmaking: Reduction Linocut Print

Today I’m sharing the process of creating my first reduction linoleum block print from sketchbook to final print. A reduction print is made using one block (in this case linoleum) that you carve multiple times, printing in between each carving. This is a lovely step by step example. It’s also called a “suicide print”. Once you carve away areas of the block, you can’t get them back, so you only have one chance to get it right! It’s a good idea to make more prints that you think you need because getting the registration lined up is tricky, and you might ruin some in the process. On to the photos!

DaringHue-com_Printmaking_Project2(1)

This is the sketchbook version. On the right is a bit of a sketch I thought would be too complicated for the project. I wanted something bold and graphic, and nothing with delicate lines for my first try at reduction printing. I wanted to use really bright colors (lime, turquoise or dark blue), as well as black and white for the stripes. I also decided to play with positive and negative space in the leaves.

DaringHue-com_Printmaking_Project2(2)

This is the first carving in process. Only the spaces marked with “W” for white were carved away. I find it’s super helpful to mark my colors with a Sharpie so that I don’t get distracted and carve away the wrong section.

DaringHue-com_Printmaking_Project2(3)

This is the first print. It was hard for me to envision how the final print would turn out at this point, but I loved the color. I used a thin handmade Japanese mulberry paper. For the assignment, we were asked to hand burnish the prints. The paper is placed over the block, and then rubbed by hand with a baren (a disc with a flat coil) until the ink transfers to the paper. Using a light Japanese paper makes it easier to hand burnish the prints.

DaringHue-com_Printmaking_Project2(4)

This is the second carving, inked up in blue. It was a challenge to carve away from the lines, as opposed to carving lines into the solid shapes. I’m hoping with more practice this will come easier.

DaringHue-com_Printmaking_Project2(5)

These are some of the prints drying after the second inking. Our apartment is on the small side, so just about every surface was taken over with drying prints. It was easier than I thought to register the paper for the second inking because I had marked lines on the top and bottom of the back of the paper to help me place it in the right spot. It was at this stage that I could finally see the magic in this process, and I started getting really excited about what I was making. I couldn’t wait to get started with the third color the next night.

DaringHue-com_Printmaking_Project2(6)

This is the last carving. Only the black lines were left, so that the leaves would be exposed in the final print. I inked up the block in black first, and did one test to see how it looked. I thought the black was very overpowering, so I mixed in a lot of white to get to a medium grey color. After the grey color was applied to the blue, it still looked black, but not an overpowering contrast. The next time I do one of these prints I will definitely test my colors first to see how they interact when layered.

DaringHue-com_Printmaking_Project2(7)

And this is the final print! I started with fifteen prints, and ruined three in the process due to printing upside down or bad registration. I narrowed it down to six of my best prints to turn in for class. Overall, I really enjoyed this process. I liked hand burnishing because I could work at home without a press. The mulberry paper is lovely, light and airy, and was fun to work with. I also really liked the planning aspect of the project. It was fun to sketch out the different layers and figure out what to carve away for each printing. I’m definitely looking forward to doing this again!

Project Life: Week 6 (2013)

DaringHue-com_ProjectLifeWeek6

I’m playing a little catch-up with Project Life. I fell a couple of weeks behind because I was ignoring all of the things I set out to do with the project at the beginning of the year. My printer ran out of ink, and I wasn’t taking pictures or recording notes throughout the weeks. I have week seven almost done, and then I’ll be relatively caught up. It’s really important for me to keep up with this weekly because I love the project, and if I miss or skip weeks I think I’d be likely to drop the project entirely.

DaringHue-com_ProjectLifeWeek6(Left)

Super simple on the left side. My trusty black Zig pen, a couple of photographs and some white craft paper.

DaringHue-com_ProjectLifeWeek6(Right)

Super simple on the right side too. I didn’t have many photos, so I gathered some tweets and cut up my to-do list from Monday. I really like the washi tape on the date card. I love the little punches of orange and red in this spread.

That’s all for now. I’ll be back with week seven soon. I’m looking forward to being caught up again. If you’re working on Project Life, how’s it going for you? What is helping you stay on top of it?

New Camera!

DaringHue-com_PrintmakingBible

I’m excited to share that after six years of using a Canon point-and-shoot, I’ve upgraded to a DSLR! I can’t wait to try it out with some daylight. First pictures were of my cat, my boyfriend, and this lovely book that I somehow accidentally purchased twice from Amazon. I opened the box and immediately thought that Amazon packaged it incorrectly, but no, this error was all mine. Oops!

List it Tuesday: Household Stencils

DaringHue-com_Stencils3

I’ve had a bit of a creative block the last week or so, so I was super excited to see today’s List it Tuesday topic at Artsyville. Aimee has the awesome idea to build a master list of unorthodox stencils as an artistic resource. In the past I have loved using a couple of these stencils to build texture and backgrounds on journal pages, and I even have the fly swatter tucked into a box with my paintbrushes. I had fun wandering around the apartment tonight to see what I else I could come up with. I used cheap craft acrylic paints and a stiff bristle brush for this project.

01. Scissors. I used the scissors by placing them down on the page and blotting the paint over and around the finger holes. I love this little graphic pattern.

02. Fly Swatter. I am a big fan of argyle, and so I love, love, love the pattern on this fly swatter. I placed it down on the page and blotted gently so that paint didn’t bleed around the stencil.

DaringHue-com_Stencils

DaringHue-com_Stencils2

03. Paper Towel Roll. I created a triangular stencil by flattening a paper towel roll, cutting shapes into it and then cutting it down the middle so I could flatten it out. I taped the stencil down so that it didn’t slide around too much while I was blotting paint down on the page. I have an image of the stencil on Flickr if you’d to see how I did it.

04. Plastic Netting. This plastic netting came from a bag of Trader Joe’s clementines (a favorite these days!). I taped the netting down, and blotted through it. This would be good to use as a background, as it slides around a bit and makes a nice soft texture.

DaringHue-com_Stencils1

05. Plastic Embroidery Mesh. This is the other “stencil” that I’ve used before and have tucked in with my paintbrushes. I like to dab lots of ink heavily through this one because I like how it bleeds through and creates a nice varied texture.

06. Metal Embellishment. I got this on clearance in the jewelry section at Michael’s figuring that I’d use it for a necklace someday. It’s been hanging around in my art stash for a long time, so I thought I’d give it some life as a stencil. I love the look of this one, and think it might stay in the collection as a stencil.

Thanks to Aimee for another fun challenge! Go check out her gorgeous fly swatter. I’m a wee bit jealous, and wish it was in my own collection.

Tiny Notebook!

DaringHue-com_TinyNotebook(1)

I’ve been so inspired by Robyn’s tiny notebook pages, that “create tiny notebook” has been on my crafty to-do list for weeks. With a little bit of time to kill on a Sunday afternoon, I decided to jump in and make one for myself. I used some leftover Canson Mixed Media paper, washi tape, embroidery thread and a cereal box to make this notebook. It’s been a long time since I’ve done any bookbinding, so there was some trial and error, but in the end it was a super fun project and quick to come together. I’ll make another one soon, and will put together a little tutorial for the blog while I’m making it.

DaringHue-com_TinyNotebook(2)

There is a fun little challenge on Instagram for tiny notebooks. Check out user tiny_notebooks and tag #tinynotebookclub for more details. Now that I have my own tiny notebook, I’ll be joining in the challenges.

DaringHue-com_TinyNotebook(3)

These are my first pages. I think the tiny notebook may have me excited about making patterns again. I always start a new sketchbook a few pages in because I’m scared of “messing up” the first few pages. I go back later and fill in the pages I skipped. Does anyone else do this?